
Are you ready to experience increased output, faster production, and consistent cures? It’s time for a conveyor dryer. Conveyor dryers are more efficient at curing than flash dryers or heat presses because they provide less guesswork and output at higher volumes. But how do you get it all set up and dialed in to work best for your shop? Let’s jump in.

WHAT IS A CONVEYOR DRYER AND DO I NEED ONE?
Conveyor dryers can run multiple shirts through at a time which helps speed up production. Think of it as a souped-up flash unit with a conveyor belt underneath. The dryer provides a covered area for the shirts to cure evenly.
Depending on the garments being printed and the ink used, the conveyor dryer setting may need some adjustment. Think of curing a shirt like throwing a dart at a dartboard. The longer the dryer tunnel, the larger the bullseye is. It’s easier to hit the bullseye when the target is bigger. Shorter tunnel dryers can be more difficult to dial in, but there are plenty of settings to adjust to get everything working just right.
RELATED: SUPPLY AND EQUIPMENT UPGRADES THAT IMPROVE PRODUCTION AND QUALITY OF PRODUCT
DRYER SETTINGS
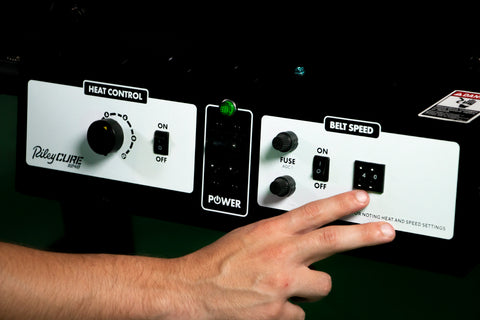
All conveyor dryers come with basic controls: on/off switches for the belt and heating element. All conveyors also have a belt speed control, which comes in handy (more on this later). Larger dryers like the RileyCure 245 also include temperature control while compact dryers do not have this feature.
All these settings mean you can adjust your conveyor to work best for you. Let’s take the garment type as an example. Not all jobs are printed on stable cotton fabric. To get the best cure on any garment, you’ll need to adjust dryer settings.
GARMENT TYPE AND CURING
The garment you’re printing and curing on will make a difference in the dryer. Cotton garments, for example, will absorb and hold moisture from the environment. When the garment goes through the dryer, the moisture evaporates and turns into steam. This steam will actually cool down the dryer a bit, making it more difficult to get both the garment and the ink up to cure temp.
Cotton garments take the most effort to reach cure temperatures. Other garments like Triblend or 50/50 garments have some cotton, but some polyester or other fabric. These won’t take as long to reach cure temperature as a 100% cotton shirt would. Shirts made from 100% Polyester will be very quick to heat up since there’s no cotton to absorb moisture from the atmosphere.
Now let’s talk about hoodies for a second. This fabric is typically very airy, meaning that even though the hoody can be half cotton, the fabric is low density and can heat up fairly fast. Since hoodies are thick, the print will typically be up above the belt and closer to the heat panels. This proximity allows the ink to heat up fairly fast.
Having a conveyor dryer allows printers to adjust settings for not only garment type, but ink type and ink deposit thickness as well.
RELATED: EVERYTHING YOU KNOW TO SCREEN PRINT ON SPANDEX GARMENTS
CURING DIFFERENT INKS
The thickness of the ink deposited on a shirt will determine how long it takes to reach full cure. Think of curing ink like cooking steak. A thinner cut of meat like carne asada will heat up very quickly and cook through to the proper temperature within a minute or two at most. A thicker cut of meat like a New York strip will take 5-10 minutes or more depending on the level of doneness desired.
Now that we’re all hungry, let’s take a look at curing different types of inks. Ink with FN-INK™ Puff additive, for example, will need to be cured at a lower temperature so the puff doesn’t activate and deflate in the dryer. Low-bleed inks need more delicate heat controls. The threads in polyester shirts can’t get too hot, because it will cause dye migration.
The more advanced a conveyor dryer is, the more control printers have over these settings. Large dryers like the RileyCure Forced Air Conveyor have a long tunnel with two separate zones: one for spiking the temperature of the ink and another for controlling the final ink temperature and ensuring proper cure without overheating the ink. Printers using water-based and discharge ink will benefit from this type of dryer.
RELATED: ENSURING PROPER INK CURING
There’s a perfect conveyor dryer for every shop. Here’s a guide to choosing the best one.

WHICH DRYER IS RIGHT FOR ME?
The conveyor dryer you choose in your shop depends on your needs, power availability, and shop space. For shops with limited shop space, a small conveyor like the RileyCure Tabletop works great. Printers can place the dryer on a press cart or workbench to maximize usable space. It’s a perfect entry-level conveyor dryer that will increase output without taking up a ton of space.
Remember the dartboard analogy? The longer the dryer tunnel, the bigger the bullseye. A larger dryer like the RileyCure 245 or 248 is a great, versatile option. The 245 and 248 have longer tunnels and a larger heating element to cure garments with virtually no worries.
Printing with water-based inks? You’ll want to pick up a RileyCure Forced Air Conveyor to cure those inks with confidence. The first zone is a flash zone where it heats up rapidly, becoming 50% hotter than the rest of the dryer. It’ll evaporate water from water-based inks quickly, then dwell for an extended period of time in the second zone at its cure temperature. Combined with the forced air technology, the dryer achieves great results.
RELATED: A CHECKLIST OF EQUIPMENT & SUPPLIES NEEDED TO START A SCREEN PRINT SHOP

HOW TO USE A CONVEYOR DRYER
Make sure your plugins have the correct voltage and amps for the conveyor dryer. The RileyCure 245 requires a dedicated 240 Volt, 20 Amp circuit. The RileyCure 248 requires a 208/240 Volt, 30 Amp circuit. Choosing a conveyor dryer is only half the process. Once your dryer is all set up, run a heat test to ensure your dryer is functioning properly.
Here’s how to run a heating test:
- Plug the control panel into the proper circuit.
- Turn the Main Power Switch to the ON position. The green indicator light will illuminate.
- Turn the Belt Speed to the suggested speed located in your dryer’s manual. This will change a little bit depending on the dryer.
- Flip the rocker switch for Belt Speed to the ON position to start the belt. Listen for any unusual noises. Check if the rubber edge guide is riding in the TruTrak™ roller drum grooves.
- Turn the Heat Control to 5. Flip the rocker switch for Heat Control to the ON position. Do not operate the heating element when the belt is not moving. Heat can damage the belt.
- Verify that the heating element is functioning. After about a minute of operation, briefly feel just inside both the entrance and exit ends of the chamber. The area should be warm. Keep your hand close to the belt to avoid injury. Some smoke/vapor and odor may be noticed during the initial start-up due to residual material from the manufacturing process burning off the elements.
- The working temperature will be reached after a ten-minute warm-up. You can run a test shirt through to make sure the dryer is working properly.
Proper conveyor speed can be determined by placing a small item, like a coin, on the conveyor belt and recording the time it takes to travel through the chamber. Start a stopwatch once the coin enters the entrance to the dryer chamber. Keep the stopwatch going until the leading edge of the coin exits the dryer. The coin should stay in the chamber for a minimum of 30 seconds (recommended 40-45 seconds).
ADJUST YOUR SETTINGS
Once you know the dryer is working, adjust the settings for a production run. Panel temperatures in the conveyor dryer should stay consistent throughout production. You’ll need to make small adjustments to the temperature when printing different garments as mentioned above. Remember: the thicker an ink deposit is, the longer it’ll take to reach full cure.
Take Puff ink vs. metallic ink for example. Metallic inks need a longer dwell time to reach full cure because it reflects heat. Puff, on the other hand, needs low heat to keep the maximum loft in the ink. If you’re printing these inks back-to-back, adjust dryer settings to get the best cure possible on both inks.
RELATED: TIPS FOR ADDING MANY FN-INK™ SPECIALTIES IN THE SAME DESIGN

Once garments have been cured, perform a wash test to make sure the garments have been cured. There’s always more to know about curing: stopping dye migration, printing with specialty inks, setting up an efficient production schedule, and more. A conveyor dryer upgrade is a game-changer in a print shop. Start testing, dial it in, and get those jobs out the door faster.


